How To Braid African American Hair For Beginners, Step By Step
For many, learning to braid African American hair can be a challenge. But it is a skill worth having if you want to be able to manage your own hair easily.
There are many hairstylists who can braid your hair. But for the purposes of ease and saving on costs, we’ve put together this guide. So, you can learn to do it yourself in your own style.
Contents
Decide What Kind Of Braiding You Want

The first thing to do before you braid African American hair is to decide what kind of braiding you want to do.
There are numerous ways you can braid your hair. Some involve just your natural hair and others involve using extensions.
Here are a few hairstyle ideas you can go for.
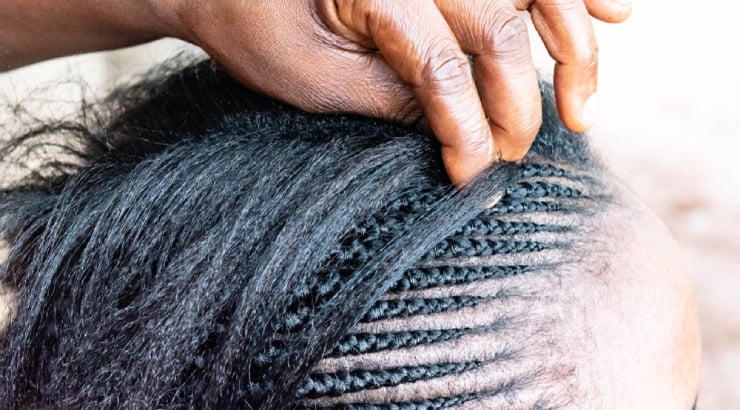
Corn Rows
Cornrows are a great style to go for if you want to braid African American hair without using extensions.
Corn rows can be done in a variety of ways. Typically, what all cornrows have in common is that the style a flat one where each braid is firmly attached to your scalp up until the very tips of your hair.
Aside from this, you can vary cornrows by adding patterns to how you do them. For instance, you can do them in a zig-zag style or a crisscross style.
Twists
Twists are another great way to braid African American hair without extensions. They are a little different from cornrows in that they are only firmly anchored to your scalp at the very top of each braid and the rest of it just hangs loose.
They also typically can be done by intertwining two sections of hair as opposed to three, which is how you do cornrows.
This type of style is very quick and easy to achieve if you want a hassle-free look.
Box Braids
This hairstyle is one of the most common ones for African American hair that involves extensions.
Box braids are more difficult to achieve than cornrows or twists. But they are definitely a good protective hairstyle.
If you do box braids well, they can last you a good number of weeks. And once you get the hang of how to do them, they are very easy to do when you need to do them.
The other great thing about box braids is that you can style them in such a versatile way. You can wear them down, wear them in an updo, or any other creative way you want.
Crotchet Braids
Crotchet braids are another type of braiding that involves extensions. These braids are a little complex than regular cornrows, twists or box braids. But they are definitely a great look.
Crotchet braids are also quite versatile. There are so many variations of them that you can try and which we recommend looking into.
And now that you have a few ideas of what kind of braids you can do, we can get into the basic and general instructions of how to braid your hair.
Wash Your Hair

First things first, before you braid African American hair, you need to go through the cleansing process.
Washing your hair is important before you braid it because it gives your hair some moisture. Moisture before styling is key because it protects your hair from potential damage.
When your hair is dry and lacks moisture, it can get really brittle. And brittle hair is much more susceptible to breakage.
This is because when you attempt to style it, especially in the combing process, you can tug and pull at it. This causes it strain that leads to it breaking.
In order to avoid all of this, it is best to give your hair a good wash before you braid it.
Sulfates Or No Sulfates?
When it comes to shampoo, one common question that arises is whether or not to use one that contains sulfates.
Shampoos that contain sulfates are usually a good idea if you want to thoroughly cleanse your hair.
Sulfates are the substance that cause it lather up. And they specifically target all unwanted substances in your hair to leave it as clean as possible.
The downside to sulfates however is that they can strip your hair of all nutrients and vitamins since they are so strong and so effective at removing external substances from your hair.
Another potential effect of sulfates is that they can remove natural oils from your hair. This is not ideal since natural oils work as a moisturizer for your hair and they also protect your hair from breakage and damage.
How To Go About Washing Your Hair
The best way to ensure you are washing your hair in a healthy way is to use a sulfates-free shampoo.
This way, when you shampoo your hair, you can ensure it retains all the vitamins and natural oils in it and can stay hydrated and nourished.
Better yet, you should invest in a type of shampoo that contains some of the key ingredients for hair growth and protection.
When it comes to vitamins, vitamin E and vitamin B are some of the most common ones to look into.
Vitamin E is particularly good at preventing hair loss and encouraging hair resilience.
B vitamins, also known as biotin, encourage hair thickening. They also encourage hair growth.
Both of these are good because they ensure your hair is getting the boost it needs to withstand all of the styling you are going to do.
Condition Your Hair

Another way to ensure your hair is well protected before you braid African American hair is to condition it after you shampoo it.
Conditioner is such an important part of haircare. This is because conditioner works to strengthen your hair and to ease styling.
Most hair conditioners are designed to thicken your hair, reduce frizz and make it softer and smoother.
This makes it easier to style in different ways. For instance, combing your hair becomes much easier without too much tugging that can cause your hair strain and breakage.
Hair conditioners come in many forms. One of the most common ones are liquid formulas which you can apply after shampooing.
Should You Use Leave-In Conditioner?
One form of liquid conditioner is leave-in conditioner. Leave in conditioner is great for a number of reasons.
The main reason leave-in conditioner is great is that it sits in your hair long enough to absorb all the nutrients in the formula.
Because you don’t immediately rinse out the conditioner, your hair has all the time in the world to take in vitamins, oils and other ingredients.
On the flip side, leave-in conditioner may not be ideal if you are trying to avoid getting too many substances in your hair. Especially if you overuse it.
Because you leave the conditioner in your hair until the next wash, excess product can really accumulate in your hair and may actually lead to dirt build-up.
In the case of preparing for braiding, it might be best then not to opt for a leave-in conditioner. But conditioner is important nevertheless.
Looking into a conditioner you can apply post-wash and rinse out fairly quickly is probably best.
And after you have washed and conditioned your hair, you need to dry it.
Dry Your Hair

When it comes to drying your hair post-wash, using low heat is probably best. This is because excessive heat can really be damaging to African American hair.
When you apply excessive heat to your hair, it gets dry and brittle. It also can thin out a bit. Dry, thin hair is much more susceptible to breakage.
So, applying excessive heat to your hair after washing and conditioning would really be undoing those previous efforts.
In order to avoid this damage, it’s best to dry your hair with cool air.
Air drying your hair would usually be good. But since you plan on braiding it, air drying would not be ideal in this case.
Air drying protects your hair from damage, but it also leaves your hair very coiled and can lead to shrinkage, which hinders how well you can braid your hair with ease.
So, the next best move is to use cool air to dry your hair using a blow dryer.
Gather The Right Tools

One other step you need to make sure you take care of as you blow dry your hair is that you have the right styling tools. Not just for blow drying and combing your hair, but for the braiding process afterwards.
There are a few kinds of hair styling tools you need by your side to make sure this whole process goes by smoothly.
The following are some examples of them.
The Right Comb
When it comes to choosing the right comb to braid African American hair, you want to make sure you pick an option that protects your hair and does not damage it.
One type of comb to avoid is a fine-toothed comb. This one is one that a lot of people may typically opt for.
The reason why many would for a fine-toothed comb is that it can be really thorough. Fine-toothed combs really get up against every hair strand and eliminate knots and kinks.
The major downside to these kinds of combs though is that they cause a lot of friction to your hair.
A fine-tooth comb will rub up so frequently against your hair strands. This will result in your potentially thinning out really quickly and breaking, which you would want to avoid.
Instead of this type of comb, it’s a good idea to get a comb with a lot of gaps between the teeth.
You should also opt for a comb with a rattail. This will be useful for parting your hair later for the braiding.
Styling Products
You’re not going to be able to braid African American hair completely without the help of styling products.
Styling products give your hair moisture that it needs to stay resilient to damage while also making it much more flexible to work with.
Some of the main styling products that you need include moisturizer and styling gels.
Moisture is good for keeping your hair resistant to breakage while you are braiding. And the styling gels help to get your hair to smooth down and remain in the particular style you want.
Fastening Tools
The other kind of tool you need to braid African American hair some kind of fastening. For instance, rubber bands for fastening the ends of your braids.
If you have mastered the art of securing your braids so that they don’t unravel, this may not be necessary.
Most professional hairstylist don’t need to do this when they braid your hair. But for beginners, rubber bands can be quite handy until you have had more practice with securing your braids.
Once you have gathered a few of these tools, you can begin to style your hair for braiding.
Comb And Detangle Your Hair

Firstly, you need to make sure you comb and detangle your hair. This is essential before you put any braids in your hair.
The reason for this is that your hair needs to be in the optimum state for extensions or other strands to grip it easily and interweave.
Combing your hair stretches it out. It removes the ridges formed by hair curling up.
This allows it to straighten more, so that it is flatter and it’s more easily accessible to braid.
Detangling your hair is important because it eliminates obstacles in your hair. Knots can make it difficult to braid your hair because they act as barriers between the section of hair above and below them.
Making sure that knots are removed before you attempt to braid your hair is therefore really important to ensuring that you don’t run into problems later.
How To Detangle Correctly
Knowing that detangling is important to the process of braiding African American hair, it is also important to know how to do it without damaging your hair.
There are a few tips you can follow to make sure you detangle your hair in a way that preserves your hair health.
One of the best ways to ensure that your hair is being detangled safely is to use your fingers to remove knots.
It’s a common misconception that people have that the only effective way to remove knots from your hair is to use a comb and aggressively tug at your hair.
This can really cause strain to your hair and lead to a lot of unwanted damage.
Instead of doing this, it’s best to gently run your fingers through your hair, section by section.
This will allow you to locate knots. And when you have located knots, you can attempt to undo them with your fingers before running a comb through them more thoroughly to make sure your hair has been detangled.
This process may feel a little tedious but it is guaranteed to protect your hair.
Another way to detangle your hair safely is to use some kind of detangling product. Detangling products come in numerous forms.
The easiest one to use is spray-in detangler. All you have to do is spray it on sections of your hair as you go and it makes it easier to work through that part of your hair with your fingers or with a comb.
Then you can protect your hair from strain.
Prepare Your Extensions

This step is only necessary for you to braid African American hair if you are going for a style that doesn’t only involve your natural hair.
This step depends on the kind of extensions you want to use on your hair. How you prepare them for braiding can vary depending on the kind.
But in order to help you understand how to go about preparing your braids, here are few tips for some popular extension types and how to get them ready.
Xpression Synthetic Extensions
This braid type is very popular with those who want to do styles like box braids or extension twists.
Xpression extensions are actually quite easy to prepare. You just have to know beforehand what you want to achieve with them.
When you open the braid packet, you will want to lift the braids with care, making sure you minimize them tangling up.
Then the next step is cutting the braids if you don’t intend for them to be as long as the extensions.
This is easy to do. All you have to do is fold up the braids evenly to create the length you want and then cut them.
Once you have done this, then you have to pull the braids. This allows them to stretch out more and become a little softer and more hair-like so you can actually use them to braid.
Part And Section Your Hair For Braiding

When you have prepared your extensions and gathered all your tools, then you are ready to braid African American hair.
The first thing to do in the actual braiding process is to part and section your hair.
Depending on what kind of braids you are going to do, your parts will look different.
What Kind Of Parts Can You Do?
With cornrows, you will likely have to do a middle part from your forehead down to the back of your head.
And then you will have to do various other sections of the two halves you’ve created for each row you are going to braid.
For box braids you would have to do something slightly different.
You would start off with your middle part. But then you would have to do several other box parts to correspond with each braid, which are a bit more complex than the cornrow ones.
Regardless of what kind of part you need to do, there are some things that you will have to be consistent about. For instance, using the right tools.
As mentioned earlier, before and combing and detangling step, you would need to have a comb that has a rattail end because it gives ease of parting and detangling.
For sectioning your hair, this type of comb is also very necessary. Because it allows you to create clear, precise separations between sections of hair, so you have distinct braids.
Another thing you will want to make sure you get right regardless of what kind of parting you are doing is the size of your parts relative to your braids.
The parts you make for your braids should always be smaller than the actual braid you intend to make.
What this means is that when you part your hair, leave enough hair in each section that you can grab onto it for braiding.
But not so much that the hair cannot be properly tucked into extensions or interwoven with other sections of hair without making a braid that is too thick.
The temptation as a beginner can be to make really wide parts with large sections of hair. Because this would mean having to do fewer braids and spend less time on the whole process.
But it is never wise to do this if you intend for your braids to last long and not have to be redone shortly afterwards.
Apply Moisturizer

Now that you have created the sections which you need in order to braid your hair, you need to prepare your hair for the braiding. Using hair moisturizer is very important for this.
Moisturizer is very important in the hair braiding process because you are going to be gripping at your hair and tugging at it in order to braid it.
If your hair is dry it will be brittle and too unmalleable for this process. Which means it can easily break as you are trying to braid it.
In order to avoid this, here are few tips for moisturizing your hair during the braiding process.
Start At The Root
The root of your hair is where a lot of the strain goes when you braid African American hair. This is why a lot of the times when braids fall out, they fall out with hair from the root.
When this happens, it is because the root of the hair that the braid is attached it would have been carrying a lot of the weight of the braid and it eventually leads to breakage.
This is why it’s important to apply moisture first and foremost to this part of your hair as you braid.
Using hair lotion, a spray in moisturizer or some kind of moisturizing butter are all viable options.
Hair lotions are very reliable and easy to use and so are hair butters. Spray in moisturizers are especially convenient because you just spritz the moisturizer in as you go and it makes process of braiding quick.
Regardless of the kind of moisturizer you choose though, there is one thing you should make sure you get out of it, and that is the right ingredients to keep your hair hydrated and nourished.
Looking for moisturizers with ingredients such as coconut oil/butter, shea butter, olive oil and other natural ingredients is a good idea.
Be Generous
When applying moisturizer, you shouldn’t hold back too much. You may be tempted to do this for fear of making your hair too damp.
But the benefits of adding a lot of moisturizer as you braid are that you ensure your hair is protected from breakage.
You don’t have to be extremely excessive with the product. But just make sure that when you apply it, it leaves your hair feeling slick and easy to maneuver.
Begin Braiding

Now that your hair is hydrated, you are ready to braid African American hair.
The technique will vary depending on the style you want to achieve. For the purposes of making it more clear, here are a few tips on how to do some of the common styles.
Box Braids
To braid box braids, you start at the base of your scalp and work your way down to the tip of your hair.
With box braids, since you are going to be adding extensions, you need to have taken the strands of extensions that you want to use before you grab onto the hair at your scalp.
With box braids, you will need to take two separate bits of hair and cross them halfway, then grab the hair on your scalp and begin to interweave them.
This process can be hard to get right the first few tries. But once you get the hang of it, it is really easy to do.
Cornrows
With cornrows, the process is a little easier in the sense that you do not have to attach any extensions to your hair.
But what makes cornrows a little more complex than box braids is that as you braid them, you have to keep adding bits of hair to keep the braid attached to your scalp.
You begin at your scalp with three separate bits of hair. You will want to make sure you don’t use too much hair at the start as your braid will eventually thicken the more you add hair.
Once you get the hang of this, it will also get easier.
Crotchet Braids
When it comes to this type of braids, you will have to do a little bit of extra effort to braid them.
This is because crotchet braids require you, first and foremost, to do some cornrows.
Because you are going to be adding extensions that you are not going to interweave with your natural hair, crotchet braids require you to lay your hair down flat and neatly.
This is to make it easier to attach the extensions to your hair. And cornrows allow for this ease.
As you braid your cornrows for crotchet braids, you will want to do one thing differently.
You will want to braid them not just in straight lines from the forehead down to your scalp. Instead, some of them need to be braided from ear to ear, or in a similar pattern.
This is because this prevents your hair from bunching up at the nape of your neck, which might make the overall result look bulky in that area of your head after you’ve added the extensions.
Use Some Edge Control

Another important step to take as you braid African American or after you do some of your braids is to apply edge control.
Edge control is necessary because as you braid your hair, you’re not going to be able to braid your edges. In fact, you shouldn’t attempt to.
Your edges are really susceptible to breakage. Because they are small sections of hair that cannot fully carry the weight and tension of a whole braid being attached to them.
This is where edge control comes in. Because you cannot use your edges to braid your hair, you need to do something to them besides just leaving them out so that they are neat.
Edge control slicks down your edges to achieve this look. Edge control is a good idea for almost every braid type.
For some braid types, however, edge control may not be necessary. For instance, with crotchet braids.
Why Not Use Edge Control For Crotchet Braids?
Crotchet braids are pretty unique in how they are done compared to other braid types. The lack of necessity of some products like edge control when doing them is one of those things that makes them unique.
Crotchet braids require you to braid your hair in rows first before you apply the extensions. In essence, braiding your natural hair is just an intermediate step.
At the end of you doing this hairstyle, your natural hair will be tucked away under the extensions, including its edges.
This is why edge control isn’t that important with crotchet braids.
Because in the process of braiding the cornrows, you would have used almost all your hair in the braids. And the bits of hair leftover won’t be visible over the extensions.
Some may still want to use edge control afterwards. Simply for the purposes of being thorough and ensuring their look comes together as neatly as possible.
But all in all, it does not make much of a difference.
And in fact, in this case, it might even be healthy for your hair to skip the edge control. Especially if you have used a lot of other hair products in excess.
For instance, the moisturizers, conditioners and styling gels.
Once you have assessed whether or not it is necessary to add edge control to the braids you are doing and taken the appropriate measure, you can move on to the last step.
Seal Your Ends

The last (and arguably most important step) when it comes to learning to braid African American hair is at the very end. This is the step where you have to seal your braids.
Sealing your braids is very important. When you don’t seal your braids, they can get frayed at the ends.
This would not be good because the hair strands of your braids would be exposed to constant friction and other potentially harmful elements.
The results of this exposure could be hair damage, breakage and split ends.
African American hair is very easily susceptible to this phenomenon. Especially if you do not moisturize it regularly.
Frayed ends could mean a lot of long-term damage to the health of your hair which would take a while and a lot of effort to undo.
Another downside to developing these frayed ends is that they leave your braids looking un-neat. They leave your hair with awkward, stray strands just sticking out at the ends of your braids.
And frayed ends also make it much easier for your braids to unravel. Because there is nothing holding the hair at the end together, it can easily separate and start to unbraid itself.
Or, at the very least, your braids begin to loosen up in terms of their interwoven pattern. This would gravely affect the look of whatever hairstyle you were going for.
In order to avoid all of this, it is important to know exactly how you can go about sealing the ends of your braids.
There are a number ways you can do this safely as a beginner.
Sealing With Hot Water
This style of sealing your braids is a pretty popular one. This method only really works for styles that use synthetic extensions though.
How this works is that when the strands of synthetic extensions are exposed to the heat, they become thin and more closely stuck together.
This makes it harder for the braids to get undone because the ends become so compactly sealed.
The best way to do this method of sealing is to heat up some water to roughly boiling point. And then pour the water in a container like a small bucket or jug.
You will then want to part your braids into a few sections. Maybe about four sections will do.
And you will want to put each section of braids into the bucket of water for about 30 seconds to a minute at most.
You don’t have to dip the whole length of each braid in the water. Just the tips of the braids will suffice.
And once the section of braids has had its time in the water, you will want to dab it with a towel to remove the excess dripping water and then let the section airdry as you repeat the process with your other sections.
Sealing With Slipknots
This type of seal is one that works for braids with hair extensions as well. It can take a bit of practice, however, to master this style of sealing your braids.
This style of sealing basically involves creating a knot at the end of each braid. The trick though is that you aim to make the knot as small and invisible as possible.
This is where it can get a little bit tricky to achieve. Because in order to make these tiny knots, you need to use very little hair.
To make a slipknot, you need as little as six strands of hair. And you basically have to take these strands from the ends of the braid you would have done.
And once you have these strands, you have to wrap them around your finger and create a loop that the whole braid should pass through in order to create the knot.
This style of sealing may be a little elaborate, but it is definitely a great one for you to master if you want to create a really presentable look with your braids.
The only downside to this method is that if you don’t do it well, it might mean having to do a lot of detangling work the next time you want to take your braids out.
Sealing With Rubber Bands
This style of sealing your braids is really good for anyone who is really new to braiding and doesn’t have the skill or patience of making any kind of elaborate seal.
This method is also really good for braids that only involve your natural hair and no extensions. Because this seal will not manipulate your hair too much in a way that can tangle it or cause it damage.
All you have to do to seal your hair this way is to take a little rubber band and tie off your braid at the point where you want it to end.And when you have repeated this process for all your braids, your hairstyle is complete.
How To Braid African American Hair For Beginners, Conclusion

Braiding African American is a great skill to learn. And it needs to be done with some care.
But as a beginner, as long as you follow the right steps, it can actually be a really enjoyable process.
If you use the right tools and products, you can achieve a variety of really great hairstyles. And you will have so much more freedom and versatility over how you can wear your hair.


